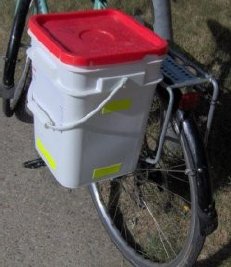
Building a bucket pannier can be fun, cheap and relatively simple. You will come out of it with a nifty, waterproof, sturdy pannier for your bike. This was first tried out at the Hauler! Moving Stuff with Bikes event, Toronto, August 2006. A printable version is available as a pdf.
Get a Square Bucket We use square buckets because they fit flat against the bike rack, though it might be possible to use round buckets if you are using the 2 bungee method. Independent cafes, grocery stores and bakeries are the best options for finding square buckets. Call ahead and ask them to start saving up square buckets so you can pick them up later. You can also buy kitty litter in square buckets at grocery stores. Make sure they come with lids – the lids that snap on are the best. Places you don't want to look for buckets: Dominion, Timothy's, Starbucks, Tim Horton's.
Attachment systems There are 3 different systems for attaching your bucket to your bike. I will list them from most expensive to least expensive:
- Arkel Hook Replacement system. I bought a pair of hooks and hangers at Velotique on Queen East for $29 before tax (you can also order them directly from Arkel online) for the two panniers. I found out later that the bar is a bit long. I will likely drill a second set of holes closer to the center so they'll fit. This seems to be the sturdiest of the attachment sytems.
- MEC hook replacements. At Mountain Equipment Co-op you can buy hangers for $6, J-hook and cord for $4, and anti-sway bar for $3 (optional). The kits come with bolts, washers and nuts. This comes to $13 for each pannier. All the gear attaches relatively easy and is quite sturdy. Place the top hangers in the places where they won't interfere with the bars on the bike rack – use your bike rack to test that their positioned correctly. If they need to go higher you can cut away some of the ridges from the bucket. Be aware that this will decrease the strength of the bucket. Using a permanent marker, mark where holes will go. Drill the top two holes and bolt on the hangers. Using the hanger as a guide drill the third hole and bolt it on. Once the hangers are bolted on estimate how much the shock cord and J-hook will need to stretch to reach the bottom “Y” of your rack. The attachments for the cord need to be on the top. Mark, drill and bolt the cord attachments. Tighten all the bolts and test it on your bike. If you think the pannier is swaying too much or if your heel is hitting the pannier you might want to attach the anti-sway bar which can prevent it from swaying too much and can help move the pannier back if you move the J-hook to the slot on either side.
- Two bungee cords. This is the simplest system that just requires two bungee cords and 6 large holes through which to thread the bungee cords (as seen in Illustrations 3 and 4 of the pdf). It isn't waterproof but it is super cheap and easy to make. The vertical hook needs to be free on the bottom and long enough to be pulled across to the other bar (as in Illustration 5 of the pdf). The bottom hole for the vertical bungee can be made off center if you want to keep the bucket away from your heel. The hole will be made on the side that will eventually be closest to your heel. It attaches onto the bike by putting the bottom hook in the upside down “Y”; the upper two hooks on the top bar; and the top hook is pulled to attach to the other bar or as far as it will go to make the vertical bungee tight.
This should be enough to get you started on making your bucket panniers. If you search the internet you can find other people who've experimented with buckets. If you have any suggestions you can send them to us.
Recent comments